
A 404 report in Google Analytics is a gold mine for data analysis. 404 error pages are not only an SEO problem but also an analytics problem.
This report is a mystery to most as this tracking goes under people’s radar. These 404 error instances happen “under the hood”. This needs detective work to collect them and derive insights from them. So, how do you find 404 pages in Google Analytics?
What is a “404 Not Found” Error?
A 404 error is a status code. This is when a user lands on a page and the browser can’t request resources because the content can’t be found. The page often displays a ‘not found’ message. You landed on a 404 error page if this message appears. It’s one of the status code examples and is important in SEO (especially for website migrations).
Why Is a “404 Not Found” Report Important?
404 page views is an example of friction that makes the user experience of a website worse. And the rule of thumb with any website is to give a frictionless experience. 404 page views might correlate a decrease in conversions.
It’s not guaranteed to connect 404 page views with low website performance. But it helps detect user activity that leads to unforeseen situations. Users might experience this friction and it’s important to fix.
404 page reports also give efficiency to digital marketers and analysts. They can capture these issues on “auto-pilot”. No more crawling in an SEO audit tool to check these 404 pages since user tracking happens in real-time.
Here’s an example…
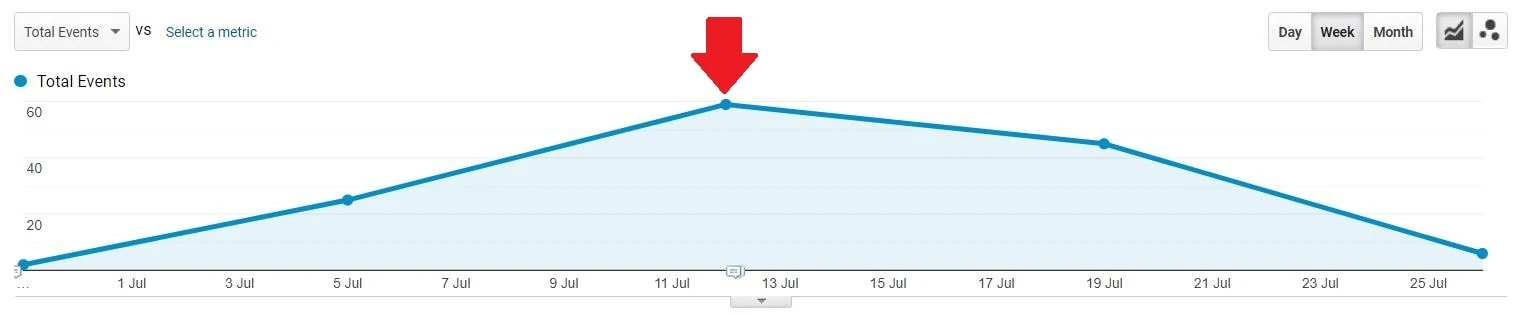
This website had a boost in 404 page views. This is due to website redesign, product re-stocking, or it might be a small mistake in the background.
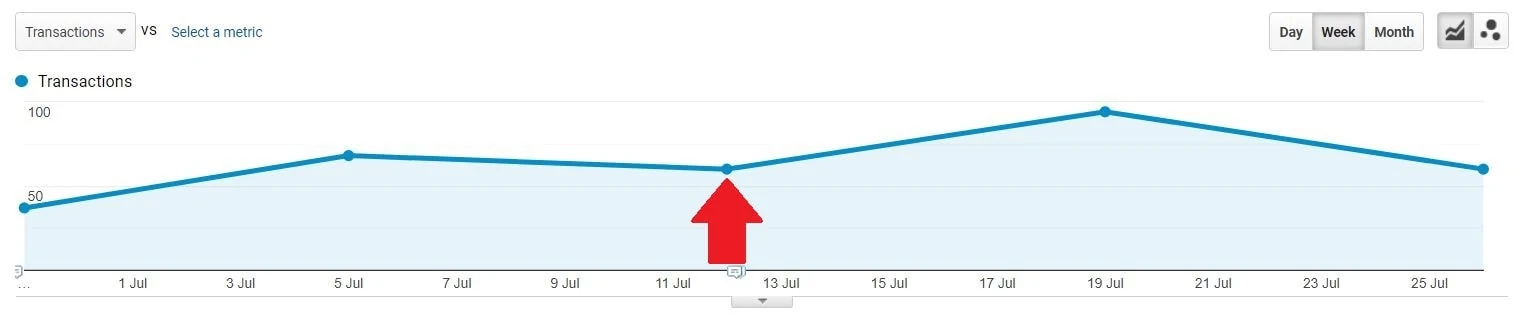
On the second screenshot, the transactions decreased. Now, there might be some correlation. It’s not 100% certain that the increase of 404 errors caused the dip in transactions. But at least it encourages further investigation.
This is one of the few ways to uncover unknowns and understand website visitors better.
How To Find The 404 Report in Google Analytics
Google Analytics is already reporting on 404 error pages.
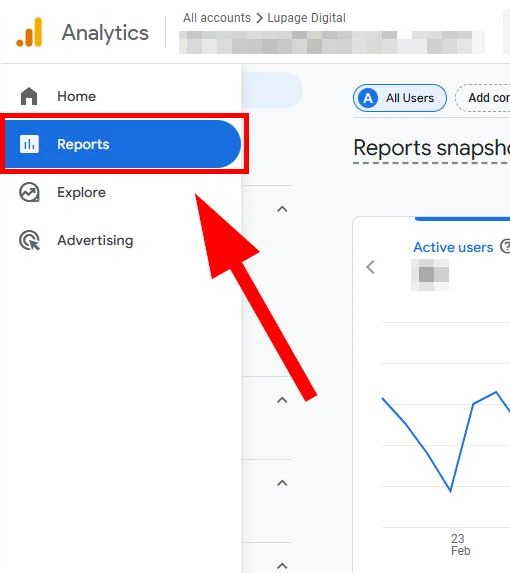
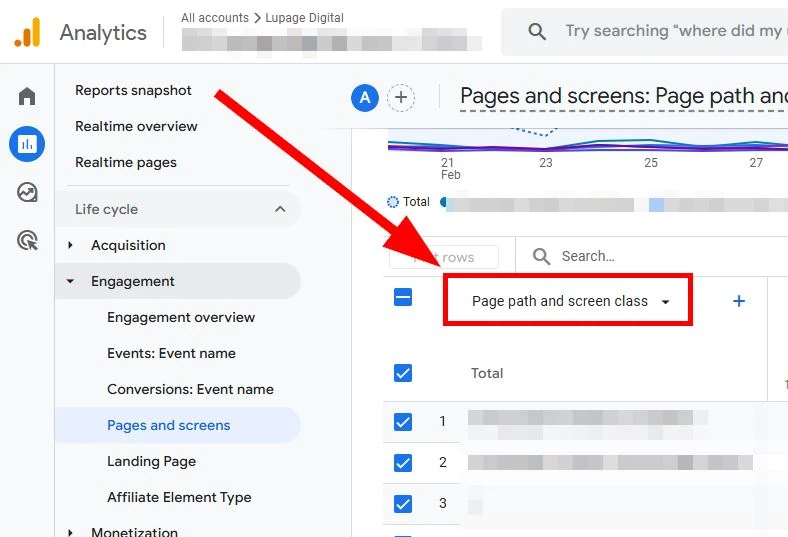
Step 1: On the left side, click on Reports.
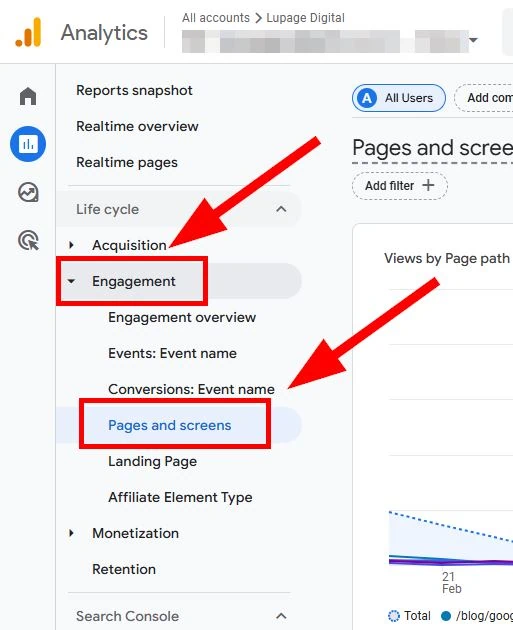
Step 2: Click on Engagement. Then click on Pages and screens.
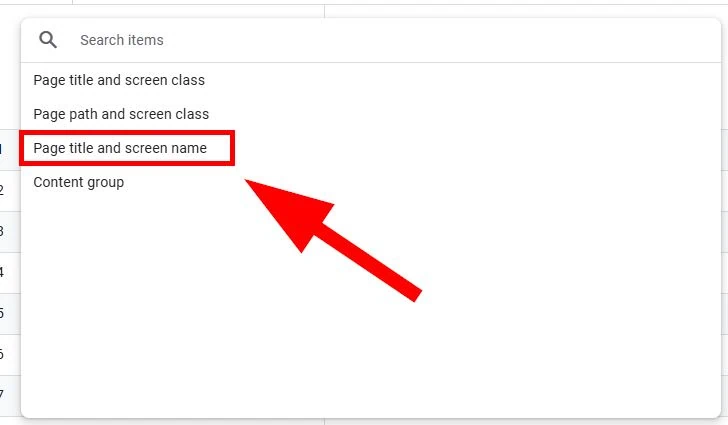
Step 3: Click on the dropdown and then select Page title and screen name.
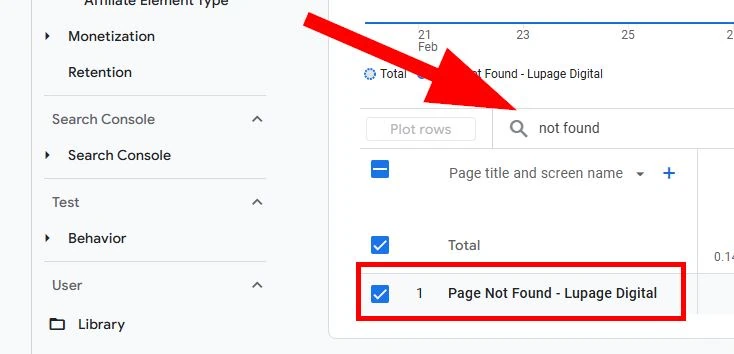
Step 4: Search for the not found pages. In most cases, it’s “404 page not found” or “404” or “not found”.
Downside of this report:
This report in GA4 has a downside. It requires a couple of clicks into the tool. Also, the report is too reactive. You won’t know 404 page views in real-time. You need to retrace the steps and correlate the 404 error. And retracing with a marketing channel, device, and the location is a challenge. It’s still possible, but it takes too many clicks and takes too long.
That said, you can also track 404 error pages in Google Tag Manager for efficiency.
Add 404 Error Tracking in Google Analytics
There are two methods to track 404 Not Found pageviews. One is the custom event approach built-in from Google Analytics 4 (GA4), which is more straightforward. The other one is through Google Tag Manager. Before doing either of these methods, the requirement is to find your 404 Error Pages.
Requirement: Find Your 404 Error Page
The first thing to do is know the title tag of your 404 pages. To do that, browse through a made-up URL under your domain.
Example: domain.com/404test

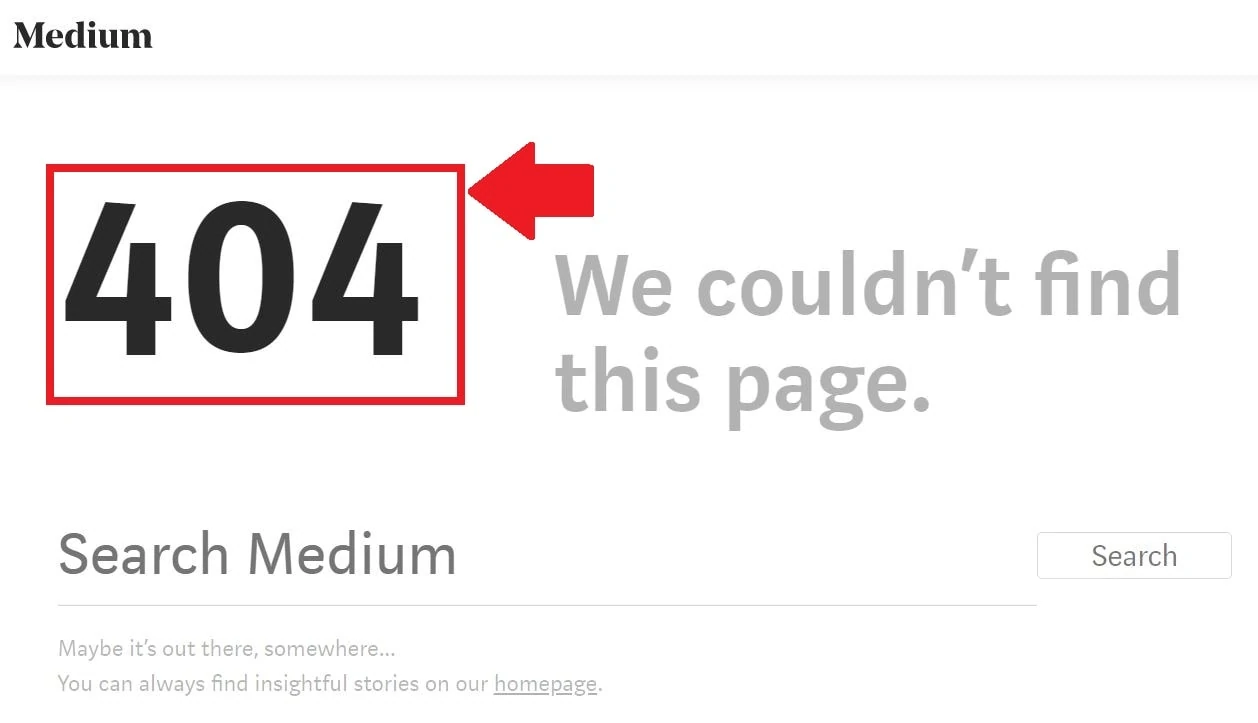
The screenshot above is from medium.com. Look at the tab on top of the web browser and remember what it says. This is the page title or SEO title tag. This is also the text when you bookmark the web page.
Add 404 Error Tracking in GA4 as a Custom Event
This method is going through GA4 and uses the custom event function. This doesn’t require coding skills and is just catching the page title and entering it in the user interface.
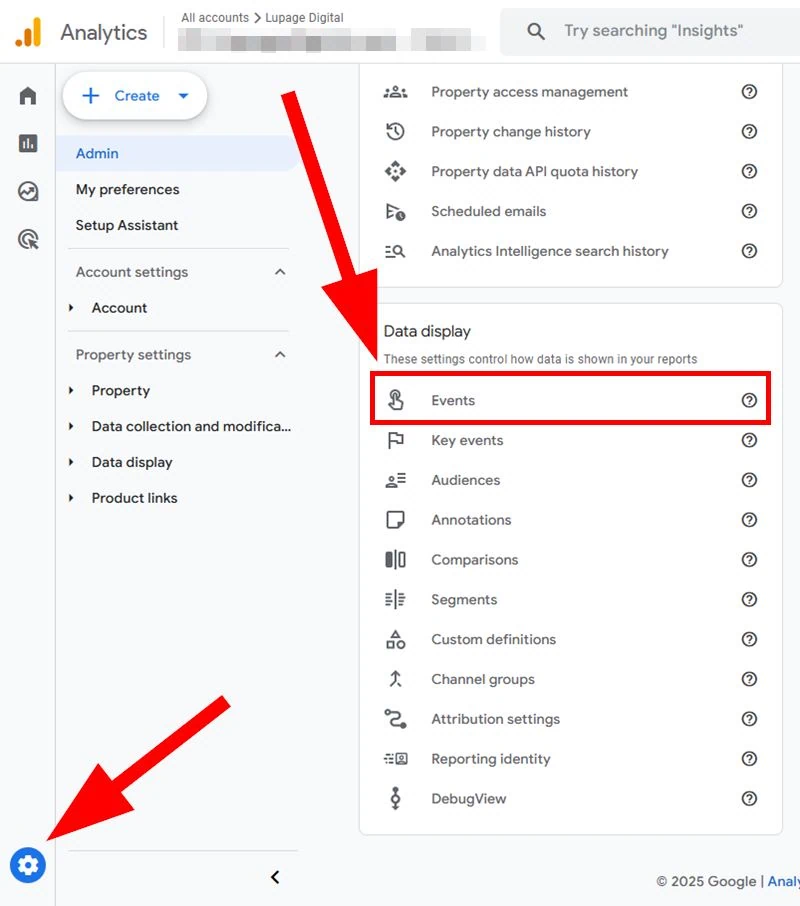
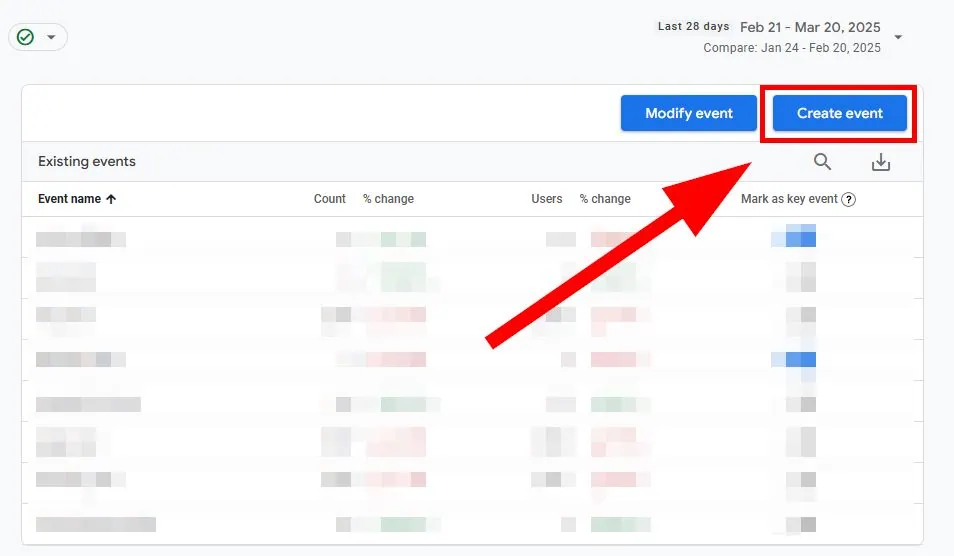
Step 1: In Google Analytics, go to Admin. Then click on Events.
Step 2: Click on Create event and then click on Create.
Step 3: Follow the settings below.
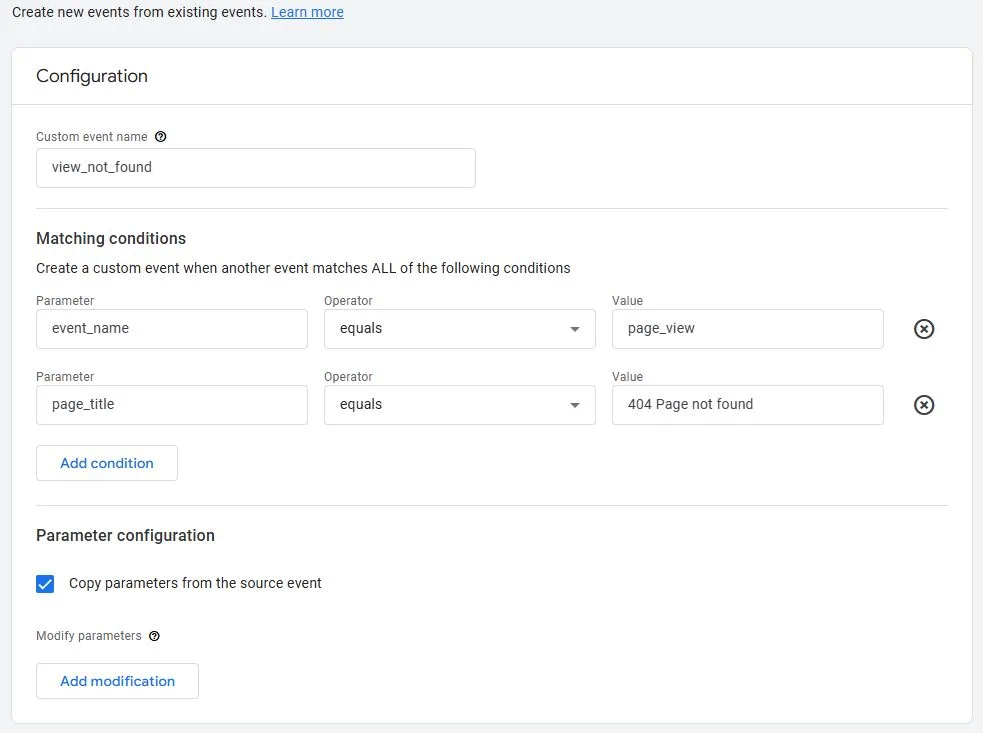
Custom event name:view_not_found. Name it however you want but when naming a GA4 event make sure you are underscores rather than spaces.
Parameters:event_name equals page_viewpage_title equals 404 Page not found. This depends on what’s your error page title for your website.
Tick the box for Copy parameters from the source event.
Step 4: Click on Create.
Add 404 Error Tracking in Google Tag Manager
This method requires Google Tag Manager implementation. Google Tag Manager is a tag management system by Google and works best with Google Analytics.
Google Tag Manager simplifies how to track user activity on the website. This tool doesn’t need heavy web development resources. Knowing a little bit of coding and having a little bit of tech-savviness helps.
Method 1: JavaScript Variable
Step 1: Click on Variables.

Step 2: Scroll Down and click on New inside User-Defined Variables.

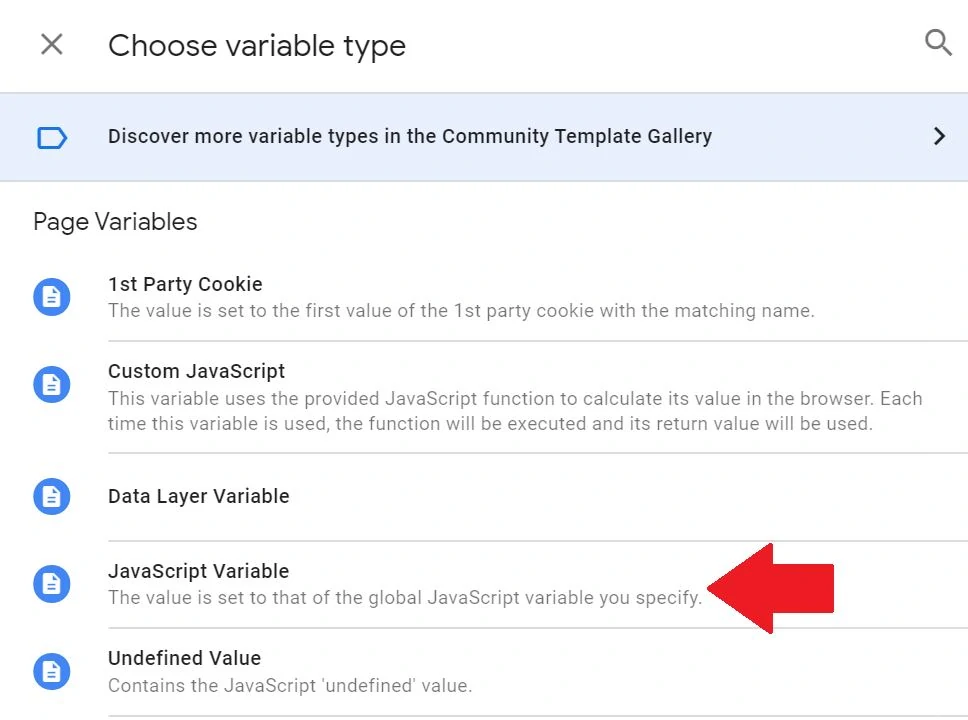
Step 3: Click on the Variable Configuration space. Then find and click on JavaScript Variable.
Step 4: Add document.title under Global Variable Name.
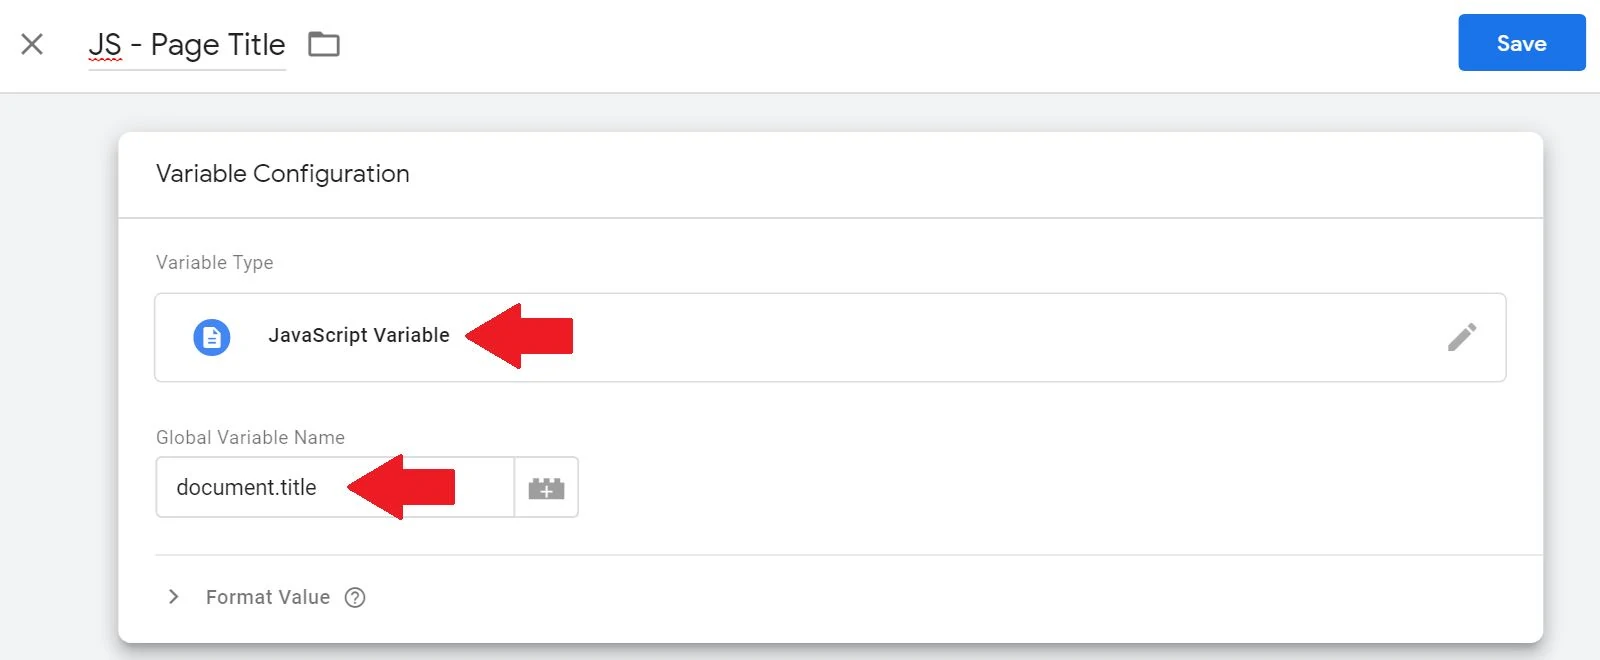
Step 5: Name the Variable and Save. Name it JS – Page Title as an example but this is up to you.
Now add a Trigger…
Step 1: Click on Triggers.
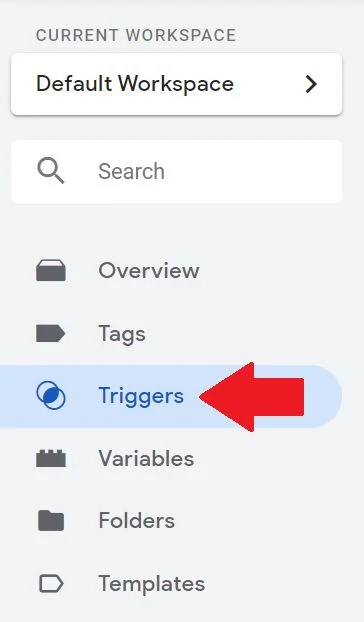
Step 2: Click on New. Then click on the Trigger Configuration space.
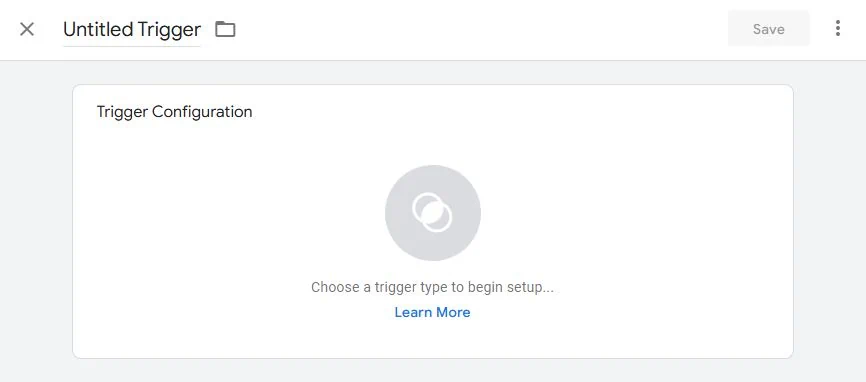
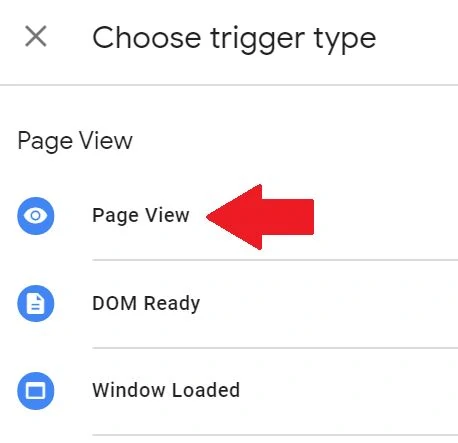
Step 3: Click on Page View.
Step 4: Follow the settings below.
This trigger fires on: Some Page Views
Fire this trigger when an Event occurs and all of these conditions are true: JS – Page Title or whatever name you gave the Variable.
contains: 404 Page not found. This depends on what’s your error page title for your website.
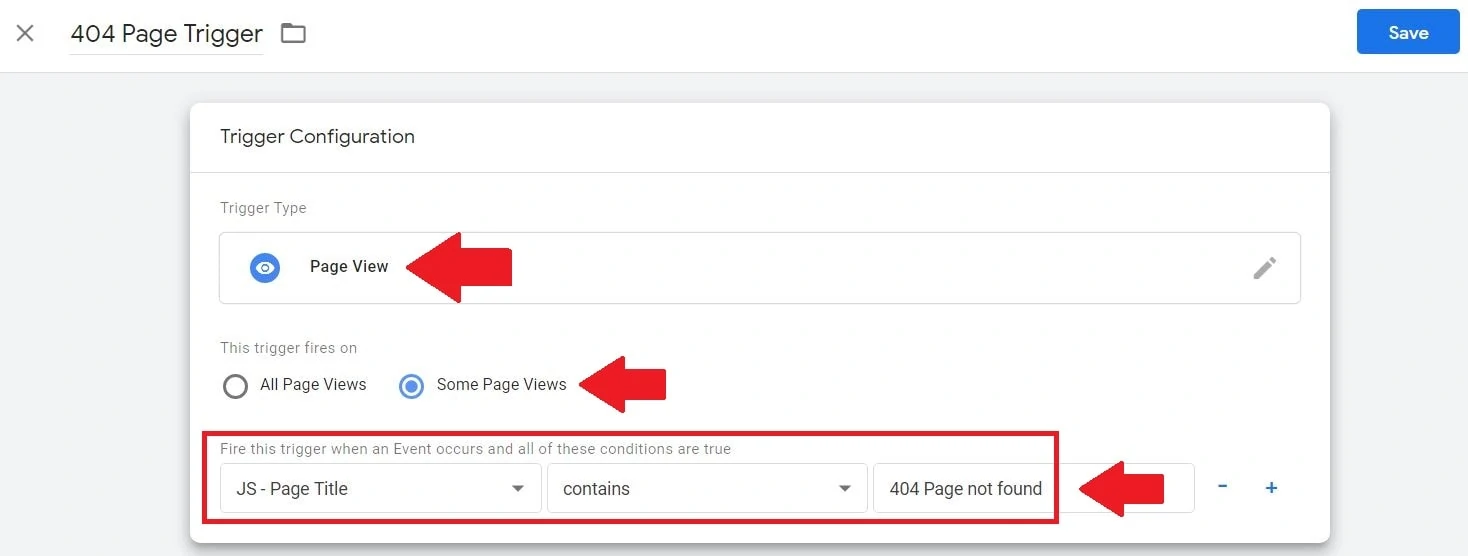
Note: Add your title tag version here from earlier. Scroll back up to the medium.com example.
Step 5: Name the Trigger and Click on Save. Name it 404 Page Trigger as an example but up to you.
Now create a Tag…
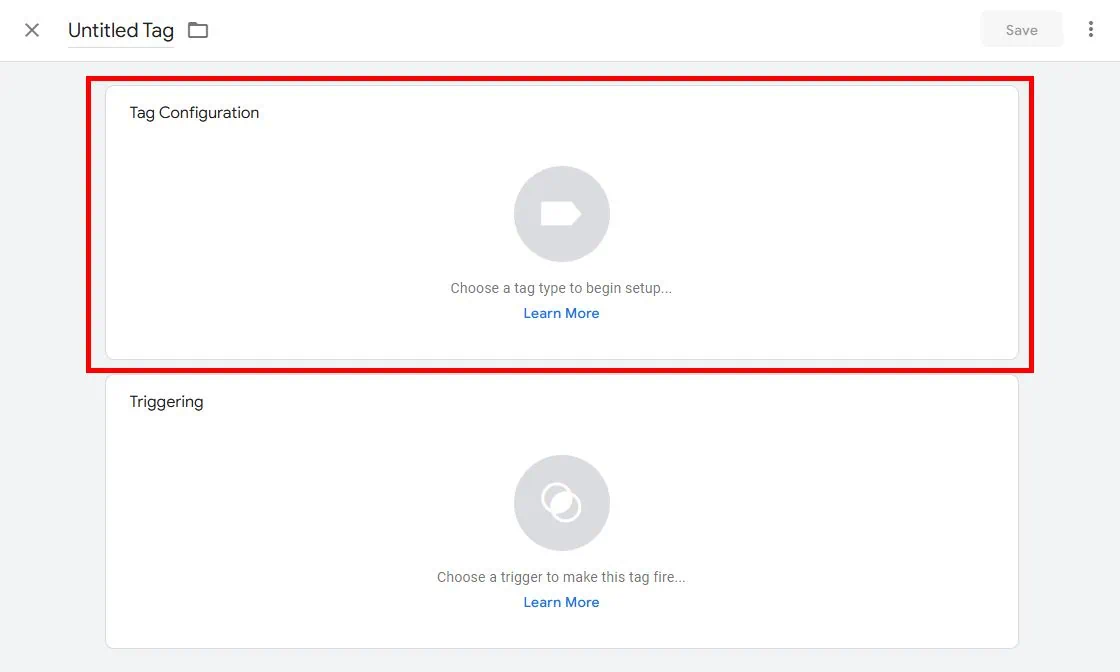
Step 1: Click on Tags.
Step 2: Click on New. Then click on the Tag Configuration space.
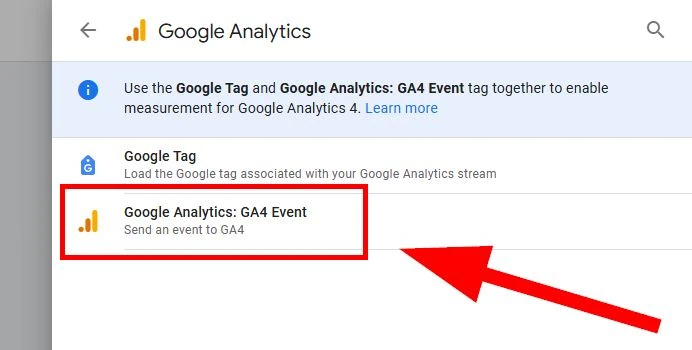
Step 3: Click on Google Analytics then click on Google Analytics: GA4 Event.
Step 4: Follow the settings below.
Measurement ID: Your GA4 measurement ID.
Event Name: view_not_found. You can name it however you want.
Event Parameters:
page_title = {{JS – Page Title}}
view_not_found = 1
The Event Parameter view_not_found is used to create custom metrics later.
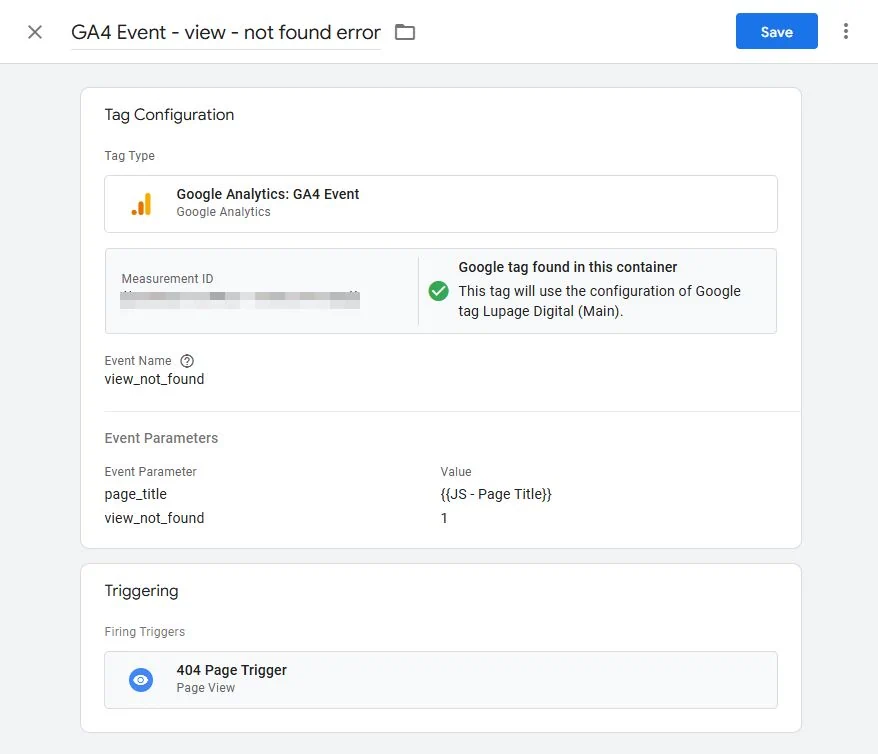
Step 5: Scroll down and click Triggering. Add the Trigger you created from earlier.
Step 6: Name the Tag and Click on Save. Name it as GA4 Event – view – not found error as an example but name it however you want.
Step 7: Make sure to Preview and Debug the Tag by going through a 404 test page. Browse through a made-up URL under your domain.

Finally, Publish the container. Done!
Method 2: Custom JavaScript Variable
Sometimes, there’s no title tag available for a website. If you look at the title tag and bookmark the page, it only specifies the domain name or a blank. This means the words “404” or “page not found” are not there.
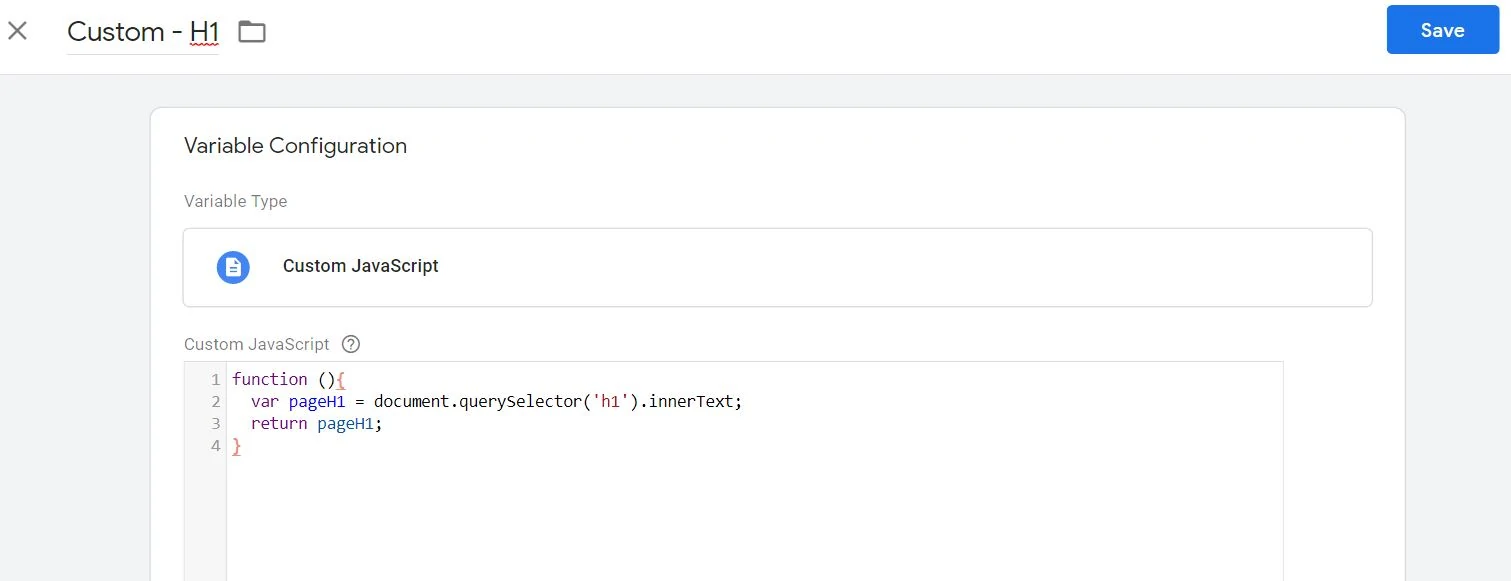
When this happens, document.title doesn’t work because there’s no data to catch. To solve this, you need to capture the on-page HTML tag instead. In most cases, the element that contains “404” on the webpage is the H1. This means you catch the H1 element.
As an example, Medium.com’s 404 page has “404” on the page. This means we can trigger Medium’s 404 page views through the HTML tag that contains “404”. Note that learning a little bit of HTML and CSS is helpful.
To find which HTML tag the 404 is in, you need to check Developer Console.
Do these sub-steps:
-Go to any web page
-Press right-click
-Click “Inspect”
Or this step:
-Go to any web page
-Press right-click
-Click “View page source”
<h1 class="col u-size5of12 u-sm-size12of12 u-xs-paddingLeft12 u-sm-fontSize150 u-fontSize200 u-fontWeightBold">404</h1>
For medium.com, the “404” text on the page is inside an H1 tag. Note that it could be different on your website. Ask a web developer or a web consultant to help out.
After getting the appropriate HTML tag, add the code snippet below to Google Tag Manager. Replace h1 to whatever the HTML tag is on your website.
function (){
var pageH1 = document.querySelector('h1').innerText;
return pageH1;
}
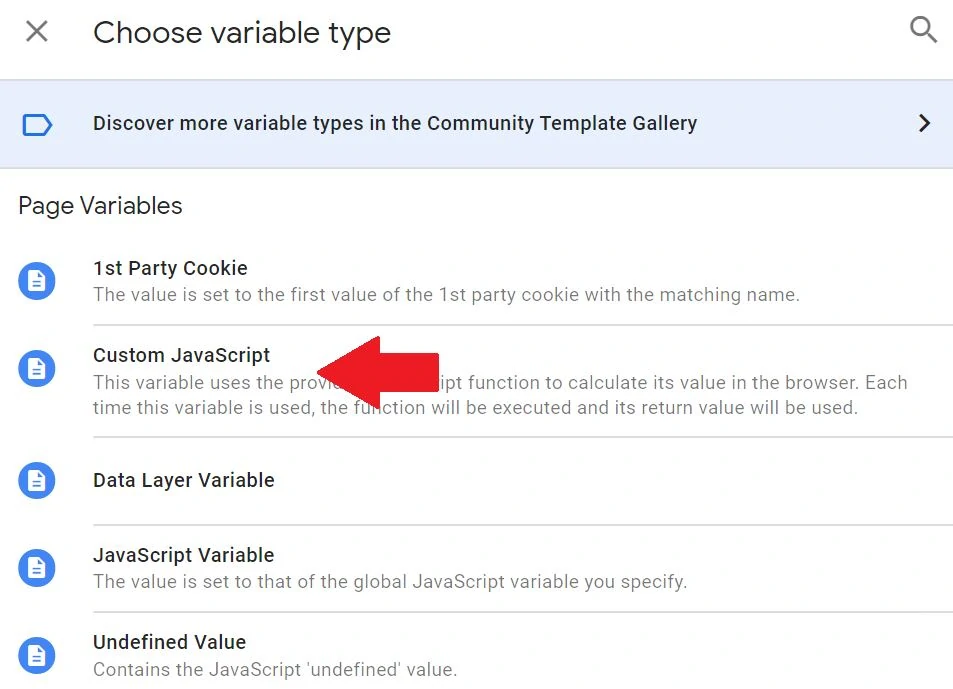
Step 1: When adding a Variable, choose “Custom JavaScript”.
Step 2: Add this code snippet under the Custom JavaScript Variable in Google Tag Manager.
After which, add the the same Trigger and Tag. Then Preview and Publish the container.
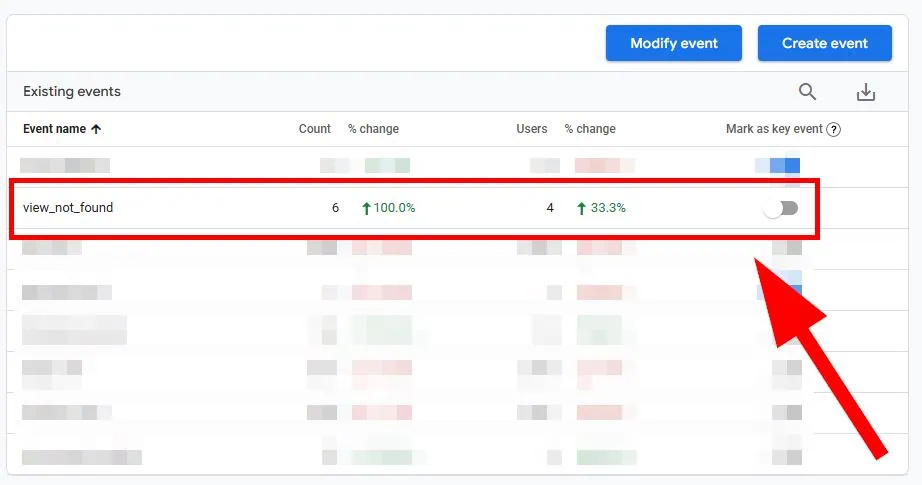
Once it gathers data, you’ll see them in the Events section.
Track 404 Pageviews in Google Analytics as a Custom Metric
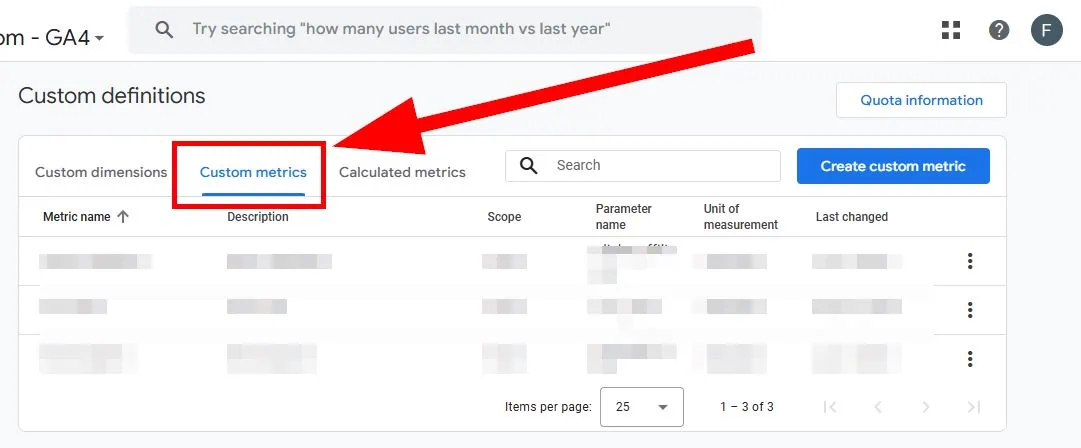
Step 1: In Google Analytics, go to Admin. Then click on Custom definitions.

Step 2: Then click on Custom metrics then click on Create custom metric.
Step 3: Add the settings and Save.
Metric name: View Not Found Errors. You may name it however you want.
Scope: Event.
Description: Add a description. This is optional.
Event parameter: view_not_found. This is the event paremeter from earlier.
Unit of measurement: Standard.
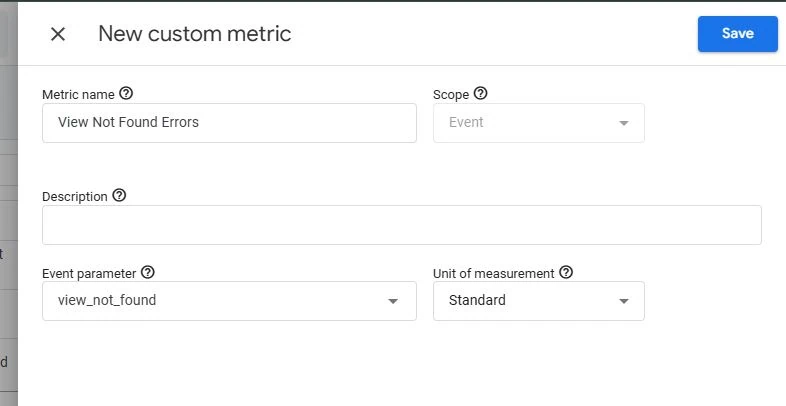
Step 4: Click on Save.
Conclusion: Start Reporting 404 Error Pages in Google Analytics
There are other ways to catch these 404 Error Pages. Screaming Frog and other SEO audit crawlers are the main tools to catch these. This guide serves from the point of view of web analytics.
Proactive 404 Error Page reporting in Google Analytics mitigates any website leaks. It’s a good way to quantify friction and possible user frustrations. 404 error pages are bad for user experience and SEO so it’s always best to 301 redirect them.
Getting more value with Google Analytics and Google Tag Manager is important. There are other user activity digital marketers can track. It’s a matter of knowing website visitors better and investigating other website activities.
References:
AnalyticsMania “How To Track 404 Errors With Google Analytics and Google Tag Manager“